


Photo by Mohammad Rahmani on Unsplash
How to Set up and Install Laravel on Windows Using Xampp and Server Auto Reload With Live Server
Learn how to properly set up a Laravel project with XAMPP and add hot-reload feature with live server using VS Code.


Table of contents
- Introduction
- What Is Laravel?
- Key Features of Laravel
- Who Uses Laravel?
- Advantages of Using Laravel
- What do you need to know before using Laravel?
- Part 1: How To Install Laravel on Windows
- Installing XAMPP (To gain access to PHP and MySQL)
- How to Install Composer on Windows
- Verifying Composer installation
- Installing Laravel using Composer
- Verifying Laravel Installation
- Run the Laravel project in your browser
- Starting up Apache and MYSQL with XAMPP.
- Part 2: Setting up automatic server reload with Live Server (VS Code)
- Installing Vs Code
- Installing Live Server Extension
- Installing the Live Server Chrome Extension
- Setting up Live Server Chrome Extension
- Conclusion
Introduction
In the dynamic world of web development, Laravel has emerged as a powerful and popular PHP framework, known for its elegance, simplicity, and robust features. If you're a Windows user and want to harness the full potential of Laravel for your web projects, you're in the right place. This guide will walk you through the step-by-step process of setting up and installing Laravel on your Windows machine using XAMPP, a widely-used Apache distribution containing MySQL and PHP, and then configuring a live server auto-reload mechanism to streamline your development workflow.
By the end of this tutorial, you'll have a fully functional Laravel development environment on your Windows system, complete with automatic server reloading using Live Server. So, whether you're a seasoned developer looking to explore Laravel or a newcomer eager to dive into web development, let's embark on this journey to harness the power of Laravel in a Windows environment.
What Is Laravel?
Laravel is an open-source PHP web application framework that was created by Taylor Otwell and first released in 2011. It has gained significant popularity in the world of web development due to its elegant syntax, robust features, and developer-friendly tools. Laravel is designed to make web development tasks such as routing, authentication, caching, and database management easier and more efficient.
Key Features of Laravel
Eloquent ORM: Laravel includes a powerful and intuitive Object-Relational Mapping (ORM) called Eloquent. It allows developers to work with databases using object-oriented syntax, making it easier to interact with database tables and records.
Blade Templating Engine: Laravel provides a templating engine called Blade, which simplifies the process of creating dynamic, reusable templates for your web application's front end. Blade templates are both expressive and efficient.
Artisan Console: Laravel comes with a command-line tool called Artisan, which simplifies common development tasks like creating migrations, generating boilerplate code, and running unit tests. Developers can also create custom Artisan commands.
Routing: Laravel offers a clean and expressive way to define routes for your web application. This makes it easy to create RESTful APIs and build user-friendly URLs.
Who Uses Laravel?
When it comes to web development, Laravel stands out as a shining star, catering to a diverse spectrum of users, each reaping unique benefits from this robust PHP framework. Here is a list of top websites that makes use of Laravel:
Alison- A pioneer e-learning platform that provides a wide range of diploma, certificate, and upskilling courses. It has over 20 million learners and trainers across 195 countries.
Barchart- A global leading stock, forex, cryptocurrency research platform mainly for markets of the USA, UK, Canada. It has a large collection of tools integrated under one platform.
InvoiceNinja - An open-source invoicing solution for businesses and freelancers to generate invoices, process payments, track expenses. Uses the SaaS model.
MyRank - An Indian e-learning platform providing input-based education to help students crack competitive exams. Offers 24/7 support and exam analysis.
Contentoo - Enables users to choose contractors for any product. Provides secure communication between contractors and employers.
Usetably - Offers restaurants tailored booking and payment solutions. Saves customer preferences for personalized experiences.
Flarum - Used to build forums efficiently. Provides real-time notifications and secure interactions between community members.
Advantages of Using Laravel
Laravel, as a powerful PHP framework, offers a wide range of benefits for web developers and businesses. Here are some of the key advantages of using Laravel:
Elegant Syntax: Laravel boasts an elegant and expressive syntax that makes coding a pleasure. It simplifies complex tasks and reduces code verbosity, leading to more readable and maintainable code.
Modular Packaging: Laravel utilizes Composer for package management, allowing developers to easily integrate third-party libraries and components into their projects. This modular approach saves time and promotes code reuse.
Artisan Console: Laravel's command-line tool, Artisan, automates repetitive tasks such as database migrations, seeding, and code generation. It significantly speeds up development and helps maintain a consistent codebase.
Built-in Authentication and Authorization: Laravel provides out-of-the-box support for user authentication and authorization. This feature simplifies the implementation of user access control, including registration, login, and password reset functionalities.
Blade Templating Engine: Blade is Laravel's templating engine, designed for creating dynamic, reusable templates with minimal overhead. It allows for efficient template inheritance and enables developers to craft stunning, responsive web interfaces.
What do you need to know before using Laravel?
Before embarking on your journey with Laravel, it's essential to have a foundational understanding of the following prerequisites:
Fundamental grasp of PHP programming: Laravel is a PHP-based framework, so having a basic knowledge of PHP is crucial. Familiarity with PHP syntax and concepts will enable you to work effectively within the Laravel environment.
Comprehension of the MVC (Model-View-Controller) architectural pattern: Laravel follows the MVC architecture, which separates the application into distinct components for better organization and maintainability. A foundational understanding of MVC will help you grasp Laravel's structure and principles more easily.
Proficiency in using the command line/terminal: Laravel's command-line tool, Artisan, is a powerful asset for automating tasks and managing your application. Being comfortable with command-line operations is beneficial for efficient development and debugging.
Experience with HTML, CSS, and JavaScript (optional but advantageous): While not strictly required, having prior experience with front-end technologies like HTML, CSS, and JavaScript can enhance your ability to create dynamic and interactive web applications using Laravel. This knowledge allows you to seamlessly integrate Laravel with your front-end components.
By ensuring you have these prerequisites in place, your journey with Laravel will be more productive and rewarding, empowering you to harness the full potential of this exceptional PHP framework for your web development projects.
Part 1: How To Install Laravel on Windows
Now let's get right into the technical aspect, we will follow through the below steps to have Laravel installed and working in our system.
Install XAMPP (to install PHP and MySQL)
Install Composer
Verifying Composer installation
Installing Laravel using Composer
Verifying Laravel Installation
Starting the Xampp server
Run the project in your browser
Installing XAMPP (To gain access to PHP and MySQL)
XAMPP is a popular, open-source, and cross-platform web server solution that simplifies the process of setting up a local web development environment on your computer. The name "XAMPP" is an acronym that stands for:
X - Stands for "cross-platform," meaning it's available on various operating systems, including Windows, macOS, and Linux.
A - Refers to "Apache," which is the web server software included in XAMPP.
M - Stands for "MySQL," a relational database management system (RDBMS) included in XAMPP.
P - Represents "PHP," the scripting language used for web development, also included in XAMPP.
P - Lastly, "P" is for "Perl," though it's used less frequently compared to the other components
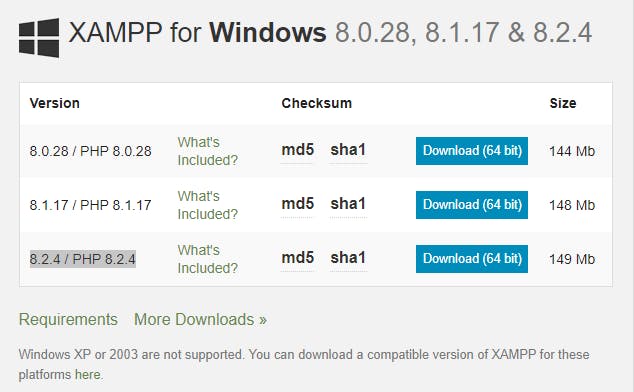
To install XAMPP, head over to the official download page and click on download. The latest version as of the time of writing this tutorial is v8.2.4 / PHP 8.2.4.
Once you download, locate the .exe file on your file explorer and double-click to start the installation.
Follow the setup wizard and install it.
How to Install Composer on Windows
Composer is a dependency management tool for PHP that simplifies the process of adding and managing external libraries, packages, and dependencies in your PHP projects. It is a crucial tool for modern PHP development and is often referred to as a package manager for PHP.
Head over to the official Composer website and download the executable file.
Run the .exe file and follow the prompts, it will auto-set up your PATH variables so that you can be able to call "composer" from anywhere on the command line.
PS: Make you install for all users. Also, ensure the PHP path is correct. This should be the path to the XAMPP PHP installation e.g. C:\xampp\php
Verifying Composer installation
Once you have finished with the installation, it's time to test whether it is working.
- Open up your command line with
Win + R keyand typecmdwithout quotes into the dialog box.
$pic
- Now type:
composer --version
If everything works correctly, you should see the version of composer that you are using for me it's version 2.5.8.
Installing Laravel using Composer
Once Composer is all set up, it's time to install Laravel globally so you can be able to use it to quickly set up a project.
But before you do that, navigate to htdocs located at: C:\xampp\htdocs
- Once here, pull your command line and type:
composer create-project laravel/laravel app-name
- This will download and install all the necessary files and libraries required for developing a laravel app.
Don't forget to change app-name to your preferred name for your project.
Verifying Laravel Installation
To verify if truly Laravel was installed, type:
laravel --version
You should see the laravel version, that means it was successful.
Run the Laravel project in your browser
- From here, you can run:
php artisan serve
And that's it!!, visit localhost:8000 to view your live Laravel website with the default template.
But sometimes, it doesn't work like in my case. I waited hours but it was just stuck on the next line.
(Edit: Well, I did find out that the server was running in the background but GitBash somehow suppressed the running message indication)
There are two fixes to this:
Running
php -S localhost:8000 -t publicthen visitlocalhost:8000on your browser.Or, using XAMPP, which I recommend if you want to follow through to Part 2 of this tutorial.
Starting up Apache and MYSQL with XAMPP.
Now to use Apache webserver which I noticed was a lot faster than php -S localhost:8000 -t public which is the inbuilt server that comes with php.
- Open up your XAMPP and start both Apache and MySQL.
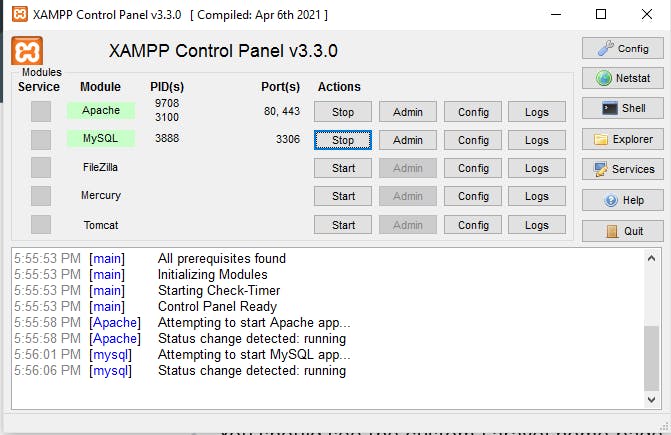
Head over to http://localhost/your-app-name/public/
You should see the custom Laravel home page. Remember that the laravel root project file should live in htdocs.
That is all for the first part of the tutorial, you can open the folder in VS Code and start coding.
But if you are like me and want to go the extra step to enable Hot Reload to see changes as fast as possible, read on.
Part 2: Setting up automatic server reload with Live Server (VS Code)
For this part, you need to have Vs Code installed as we will be using an extension from the vs code marketplace.
Installing Vs Code
To install Vs Code, head over to the official website and download Vs Code for Windows or your OS.
Go ahead and run the executable file while following the installation wizard.
Installing Live Server Extension
Once you are set, you need to install Live Server extension. We will use this extension in conjunction with the Chrome extension to make our server auto-reload on file change.
- On VS Code, locate the extension icon, type "live server" and install it.

- Restart your Vs Code to sync the app with the recent changes.
Installing the Live Server Chrome Extension
Once we have the Vs Code extension ready, we need to install one more extension on our browser to get everything ready.
- Follow this link to the Live server Chrome extension and add it to Chrome.

Setting up Live Server Chrome Extension
Now the final step is to put it all together. Make sure that your Apache and MySQL are still running on XAMPP.
Open Laravel project on Vs Code.
Just below, at the bottom status bar, you will see "Go Live".
Click on that and Live server should activate with a port number of 5500.
Next, open your Chrome browser, and click on the live server Chrome extension.
It should pull up 2 text fields.
Actual Server Address: The address of the laravel app being served by Apache through XAMPP that is: localhost/your-app-name/public
Live Server Address: The address from the Vs Code Live Server extension e.g. http://127.0.0.1:5500/
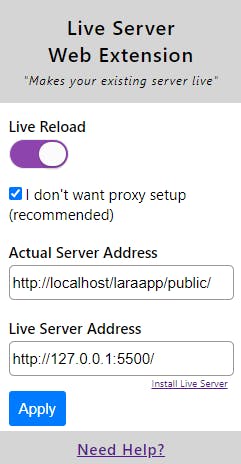
Fill that up and make sure to check "I don't want proxy setup (recommended)"
Now click on "apply", to apply the changes.
Go back to your Vs Code and edit a file. The address localhost/your-app-name/public should auto-reload the browser with the latest changes.
Enjoy!!
Conclusion
We have come to the end of the tutorial, I hope you learned a lot from this. You can follow me on Twitter, GitHub and LinkedIn for more step-by-step tutorials!